Make your own biodiesel: Journey to Forever Part 6
Make your own biodiesel: Journey to Forever
Detailed description of methods of creating biodiesel and its related issues.
Click Here to Make $20-$75/Hour for Your Opinion
1. Safety
Read and observe the Safety instructions below.
2. Lye
You need to be quick when measuring out the lye because it very rapidly absorbs water from the atmosphere and water interferes with the biodiesel reaction.
Measure the lye out into a handy-sized lightweight plastic bag on the scales (or even do the whole thing entirely inside a big clear plastic bag), then close the lid of the container firmly and close the plastic bag, winding it up so there's not much air in it with the lye and no more air can get in. Have exactly the same kind of bag on the other side of the scale to balance the weight, or adjust the scale for the weight of the bag.
How much to use. NaOH must be at least 96% pure, use exactly 3.5 grams. If you're using KOH it depends on the strength. If it's 99% pure (rare) use exactly 4.9 grams (4.90875). If it's 92% pure (more common) use 5.3 grams (5.33). If it's 85% pure (also common) use 5.8 grams (5.775). Any strength of KOH from 85% or stronger will work.
3. Mixing the methoxide
Use the "Methoxide the easy way" method -- it's also the safe way. Here's how to do it.
Measure out 200 ml of methanol and pour it into the half-litre HDPE container via the funnel. Methanol also absorbs water from the atmosphere so do it quickly and replace the lid of the methanol container tightly. Don't be too frightened of methanol, if you're working at ordinary room temperature and you keep it at arm's length you won't be exposed to dangerous fumes. See More about methanol.
Carefully add the lye to the HDPE container via the second funnel. Replace the bung and the screw on the cap tightly.
Shake the container a few times -- swirl it round rather than shaking it up and down. The mixture gets hot from the reaction. If you swirl it thoroughly for a minute or so five or six times over a period of time the lye will completely dissolve in the methanol, forming sodium methoxide or potassium methoxide. As soon as the liquid is clear with no undissolved particles you can begin the process.
The more you swirl the container the faster the lye will dissolve. With NaOH it can take from overnight to a few hours to as little as half-an-hour with lots of swirling (but don't be impatient, wait for ALL the lye to dissolve). Mixing KOH is much faster, it dissolves in the methanol more easily than NaOH and can be ready for use in 10 minutes.
4. The process
Using a blender. Use a spare blender you don't need or get a cheap secondhand one -- cheap because it might not last very long, but it will get you going until you build something better.
Check that the blender seals are in good order. Make sure all parts of the blender are clean and dry and that the blender components are tightly fitted.
Pre-heat the oil to 55 deg C (130 deg F) and pour it into the blender.
With the blender still switched off, carefully pour the prepared methoxide from the HDPE container into the oil.
Secure the blender lid tightly and switch on. Lower speeds should be enough. Blend for at least 20 minutes.
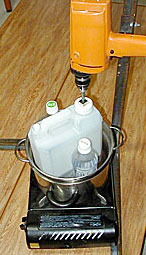 Using a mini-processor. Follow the instructions here and improvise where necessary -- there are many ways of building a processor like this.
Proceed with processing as above, maintain temperature at 55 deg C (130 deg F), process for one hour.
4. Transfer
As soon as the process is completed, pour the mixture from the blender or the mini-processor into the 2-litre PET bottle for settling and screw on the lid tightly. (As the mixture cools it will contract and you might have to let some more air into the bottle later.)
5. Settling
Freshly made biodiesel, 20 minutes after processing
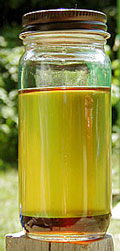 Allow to settle for 12-24 hours.
Darker-coloured glycerine by-product will collect in a distinct layer at the bottom of the bottle, with a clear line of separation from the pale liquid above, which is the biodiesel. The biodiesel varies somewhat in colour according to the oil used (and so does the by-product layer at the bottom) but usually it's pale and yellowish (used-oil biodiesel can be darker and more amber). The biodiesel might be clear or it might still be cloudy, which is not a problem. It will clear eventually but there's no need to wait.
Carefully decant the top layer of biodiesel into a clean jar or PET bottle, taking care not to get any of the glycerine layer mixed up with the biodiesel. If you do, re-settle and try again.
6. Quality
Proceed to the wash-test to check the quality. If your biodiesel doesn't pass the test, here's what to do next.
7. Washing
If it passes the wash-test then wash the rest of the biodiesel. See Washing. For washing use the two 2-litre PET bottles in succession, with half a litre of tap water added for each of the three or four washes required. Pierce a small 2mm hole in the bottom corner of each of the two bottles and cover the hole securely with duct tape.
Pour the biodiesel into one of the wash bottles. Add the half-litre of fresh water.
a. Bubble-washing. See instructions here. Use a small aquarium air-pump and an air-bubbler stone -- cut the threaded lid off the wash bottles if necessary to get the stone in. After washing and settling, drain off the water from the bottom of the bottle by removing the duct tape from the hole. Block it again with your finger when it reaches the biodiesel. Transfer the biodiesel to the second wash bottle, add fresh water and wash again. Clean the first bottle and replace the duct tape. Repeat until finished.
b. Stirring. See instructions here. If you have a small enough paint stirrer and a variable-speed drill, cut the lids off the bottles as above to accommodate the stirrer. Stir until oil and water are well mixed and appear homogenous. Settle for two hours or more, drain as above for bubble-washing, repeat until finished.
If you don't have a stirrer, don't cut the lids off the wash bottles. Add the biodiesel and the water as above. Screw the cap on tightly. Turn the bottle on its side and roll it about with your hands until oil and water are well mixed and homogenous. Settle, drain as above for bubble-washing, repeat until finished.
8. Drying
When it's clear (not colourless but translucent) it's dry and ready to use. It might clear quickly, or it might take a few days or up to a week. If you're in a hurry, heat it gently to 48 deg C (120 deg F) and allow to cool.
9. Congratulations! You have just made high-quality diesel fuel. Say goodbye to ExxonMobil & Co., you don't need them anymore.
Click Here to Make $20-$75/Hour for Your Opinion
posted by Matt @ 3:32 PM
0 comments
![]()
![]()


0 Comments:
Post a Comment
<< Home